當我們好不容易產生了一個 pcd 模型後,突然發現到忘記儲存原始的 RGB 影像以及深度影像, 這個時候要怎辦呢?你可以選擇重新使用 kinect 建立新的模型並拍下影像以及深度,也可以用 更聰明的方法 - 將 pcd 檔案轉換成 RGB 影像以及深度影像。
實際上,在 pcl 1.7 版提供了以下方法,讓你可以將 point cloud 存成 PNG 文件。
void pcl::io::savePNGFile (const std::string &file_name, const pcl::PointCloud< T > &cloud);
但是如果我們使用的是 pcl 1.6 或者以下的版本呢?這時候就得手動增加這部份的 code。
template <typename T>
void savePNGFile (const std::string &file_name, const pcl::PointCloud<T> &cloud)
{
    std::vector<unsigned char> char_data(cloud.width * cloud.height * 3);

    for (size_t i = 0; i < cloud.points.size(); ++i) {
        char_data[i*3 + 0] = cloud.points[i].r;
        char_data[i*3 + 1] = cloud.points[i].g;
        char_data[i*3 + 2] = cloud.points[i].b;
    }

    vtkSmartPointer<vtkImageImport> importer = vtkSmartPointer<vtkImageImport>::New();
    importer->SetNumberOfScalarComponents(3);
    importer->SetDataScalarTypeToUnsignedChar();
    importer->SetWholeExtent (0, cloud.width - 1, 0, cloud.height - 1, 0, 0);
    importer->SetDataExtentToWholeExtent();

    void* data = const_cast<void*> (reinterpret_cast<const void*> (&char_data[0]));
    importer->SetImportVoidPointer(data, 1);
    importer->Update();

    vtkSmartPointer<vtkImageFlip> flipYFilter = vtkSmartPointer<vtkImageFlip>::New();
    flipYFilter->SetFilteredAxis(1);
    flipYFilter->SetInputConnection(importer->GetOutputPort());
    flipYFilter->Update();

    vtkSmartPointer<vtkPNGWriter> writer = vtkSmartPointer<vtkPNGWriter>::New();
    writer->SetFileName(file_name.c_str());
    writer->SetInputConnection(flipYFilter->GetOutputPort());
    writer->Write();
}
使用上面的程式碼,你就可以在 pcl 1.6 中將你的 point cloud 存成 png 圖片。
現在我想要將我的點雲轉變成為深度圖檔,這時該怎麼辦呢?你可以用下面的程式完成他:
template <typename T>
void saveDepthToPNG (const std::string &file_name, const pcl::PointCloud<T> &cloud)
{
    pcl::PointCloud<T> depth = cloud;

    double max = 0, min = 0;

    for (int i = 0; i < (int) depth.points.size(); i++) {
        if(depth.points[i].z > max) max = depth.points[i].z;
        if(depth.points[i].z < min) min = depth.points[i].z;
    }

    float scale = (max - min) / 256;

    for (int i = 0; i < (int) depth.points.size(); i++) {
        unsigned int t = depth.points[i].z / scale;

        // make sure pixel value between 0 ~ 255
        t = (t > 255) ? 255 : (t < 0) ? 0 : t;

        depth.points[i].rgba = ((t << 16) | (t << 8) | t);
    }

    savePNGFile(file_name, depth);
}
這個程式透過範圍的計算,將深度轉換成 0 ~ 255 的灰階值, 並將顏色塗到點雲上面, 最後再將點雲存檔成為 png 圖檔。
透過這樣的簡單步驟,我們就可以將 pcd 檔案轉換成為 RGB 彩圖 與 深度圖了。
下面列出簡單的主程式與結果
#include <iostream>
#include <string>
#include <cmath>
#include <pcl/io/io.h>
#include <pcl/io/pcd_io.h>
#include <pcl/point_types.h>
#include <pcl/visualization/cloud_viewer.h>

typedef pcl::PointXYZRGBA PointT;

int main(int argc, char *argv[])
{
    std::string pcd_file("room.pcd");

    pcl::PointCloud<PointT>::Ptr cloud (new pcl::PointCloud<PointT>);
    pcl::io::loadPCDFile(pcd_file, *cloud);

    // save origin pcd file to png pictre
    std::string rgb_file("room.png");
    savePNGFile(rgb_file, *cloud);

    // save depth image
    std::string depth_file("room_depth.png");
    saveDepthToPNG(depth_file, *cloud);

    return 0;
}
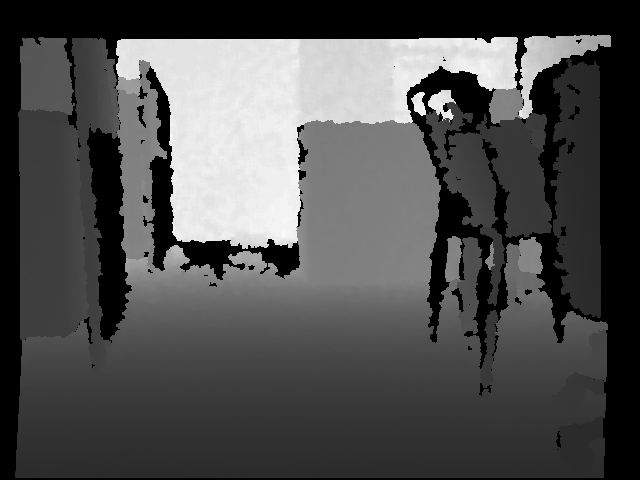
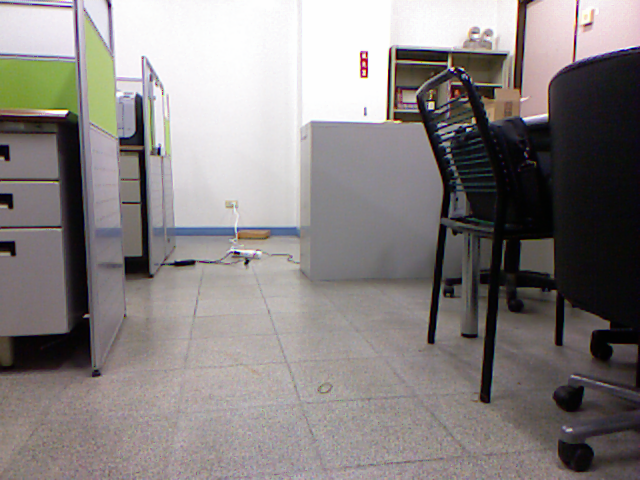
透過這個程式,你就可以將 room.pcd 轉換成以下兩張圖形
RGB 彩圖
深度圖