UltraZed-EG PCIe Carrier Card 開發紀錄: 使用 PetaLinux 建立系統

在了解了如何透過 Vivado 搭配 Xilinx SDK 來控制 Cortex-A53 和 Cortex-R5 後,是時候把 Linux 裝上來啦。

針對不同嵌入式環境的需求,Xlinux 針對他們自己的平台,提供了基於 Yocto Project 製作的發行板製作工具,並命名為 PetaLinux 。這篇文章將介紹如何使用基本的 PetaLinux 功能,並建立一個可開機的映像檔 (Image) 讓 UltraZed-EG PCIe Carrier Card 開機並進入到 Linux 系統。

(本文以 Vivado 2018.2 以及 PetaLinux 2018.2 進行開發)

PetaLinux 和 Yocto 的不同

一開始遇到 PetaLinux 時會覺的奇怪,使用 Yocto Project 建立自己的 Linux 系統就好了,為什麼還需要 PetaLinux 呢?實際上,Xilinux 在 PetaLinux 加了不少工具,包含如何讓 PetaLinux 呼叫一些 Xilinux SDK 裡面的工具,讓你可以方便的產生出開機用的 BOOT.bin ,除此之外,最重要的應該就是 device tree 的產生了。

由於 UltraZed-EG PCIe Carrier Card 這塊板子上的 SoC 是 FPGA 搭配 ARM Cortex-A53/R5 這樣的組合,有些我們需要加速處理的部份會需要透過 FPGA 來實做,而在 UltraZed-EG PCIe Carrier Card 開發紀錄: Hello Cortex-R5 一文中,我們產生中斷(interrupt)時候需要的中斷編號 (XPAR_FABRIC_AXI_GPIO_0_IP2INTC_IRPT_INTR) 也是透過 Xilinx SDK 來幫我們產生的。

使用 PetaLinux 來建立系統時候,PetaLinux 會根據你的硬體設置,自動幫你生成相對應的 Device Tree ,讓我們的開發可以變得比較輕鬆。如果是用純粹的 Yocto Project 的話,很多地方就要先確認好才可以整合進去了,會比較麻煩些。

當然,因為 PetaLinux 畢竟是基於 Yocto Project 設計的,因此在使用 Yocto Project 時學會的 recipes 撰寫等知識都還是可以套用到這邊。

讓我們來看看怎樣用 PetaLinux 來建立 UltraZed-EG PCIe Carrier Card 的開機映像檔吧~

在進行以下步驟前,建議先閱讀一下 UG1144 (v2018.2): PetaLinux Tools Documentation Reference Guide.pdf 這份 PetaLinux 的官方文件。

下載 PetaLinux

首先第一步就是連到 Xilinx 官網 去下載 PetaLinux 啦,由於 PetaLinux 只能在 Linux 下面執行,因此你也需要準備一個 Linux 虛擬機才行呦~

下載 PetaLinux 2018.2 Installer (需要註冊才可以下載)

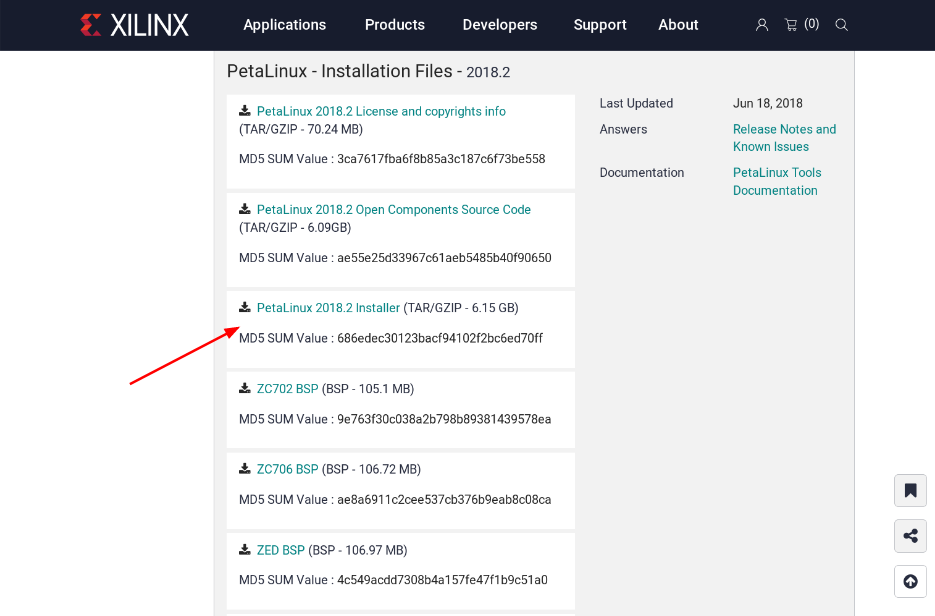
下載完成後,會得到 petalinux-v2018.2-final-installer.run 這個檔案。

下載 sstate-cache (optional)

除了下載 PetaLinux 2018.2 Installer 外,有用過 Yocto Project 的人應該都知道,為了減少時間, Yocto Project 會把已經編譯好的物件檔放到 sstate-cacehe 資料夾內,因此為了加速編譯的速度,我們也下載一下 Xilinx 提供的 sstate-cache

一樣到 這裡 去下載我們要的檔案

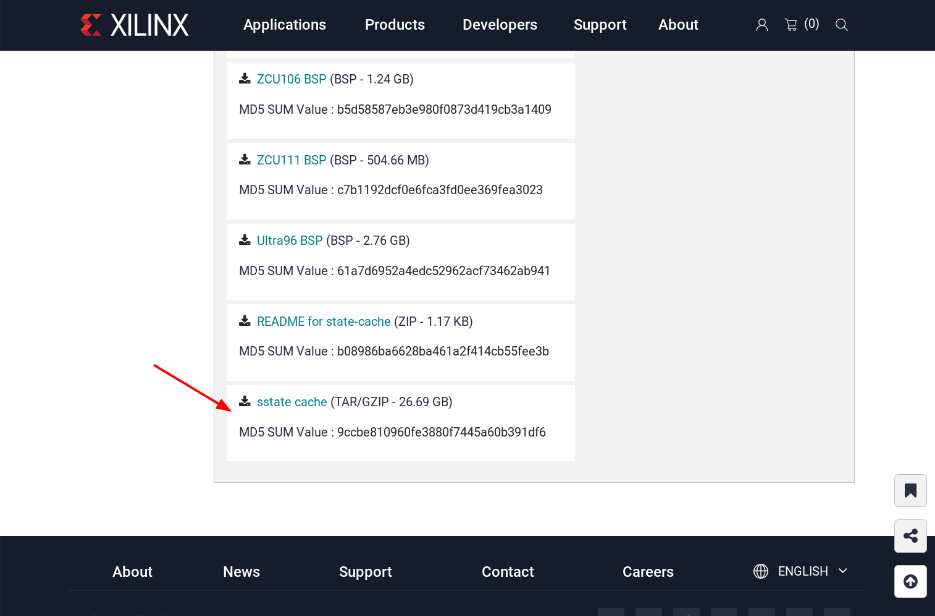
下載完成會得到 sstate-rel-v2018.2.tar.gz 這個檔案

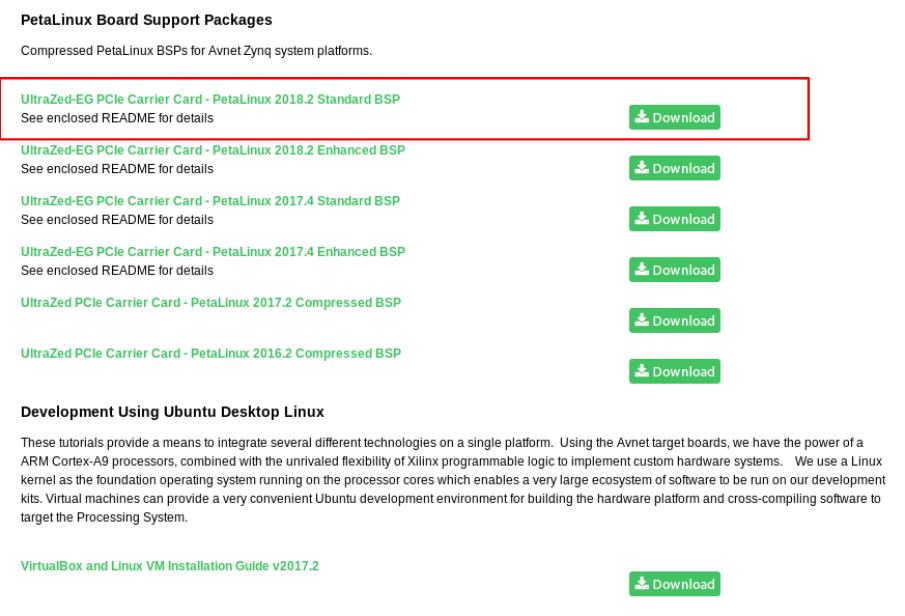
下載 UltraZed-EG PCIeCC BSP

接下來,我們要到 這裡 去下載由 AVNET 公司所提供的預先製作好的 petalinux-bsp 包,這裡選擇 UltraaZed-EG PCIe Carrier Card - PetaLinux 2018.2 Standard BSP

下載完成會得到 uz3eg_pciec_2018_2.zip 這個壓縮檔

安裝 PetaLinux

現在我們有了 petalinux-v2018.2-final-installer.runsstate-rel-v2018.2.tar.gzuz3eg_pciec_2018_2.zip 這三個檔案,就來安裝吧

(記得要看一下 UG1144 (v2018.2): PetaLinux Tools Documentation Reference Guide.pdf 確定你系統相關套件已經滿足了呦)

假設我要裝到 ~/petalinux/2018.2 則這樣執行它,然後你需要同意很多個條文才行

coldnew@gentoo ~ $ ./petalinux-v2018.2-final-installer.run ~/petalinux/2018.2
INFO: Checking installer checksum...
INFO: Extracting PetaLinux installer...

 skip ....

Press Enter to display the license agreements
Do you accept Xilinx End User License Agreement? [y/N] > y
Do you accept Webtalk Terms and Conditions? [y/N] > y
Do you accept Third Party End User License Agreement? [y/N] > y

 skip ....

INFO: Checking PetaLinux installer integrity...
INFO: Installing PetaLinux SDK to "/home/coldnew/petalinux/2018.2/."
=================================================
SDK has been successfully set up and is ready to be used.
Each time you wish to use the SDK in a new shell session, you need to source the environment setup script e.g.
 $ . /home/coldnew/petalinux/2018.2/components/yocto/source/environment-setup-cortexa9hf-neon-xilinx-linux-gnueabi
 $ . /home/coldnew/petalinux/2018.2/components/yocto/source/environment-setup-microblazeel-v10.0-bs-cmp-re-mh-div-xilinx-linux
 $ . /home/coldnew/petalinux/2018.2/components/yocto/source/environment-setup-microblazeel-v10.0-bs-cmp-re-ml-xilinx-linux
INFO: PetaLinux SDK has been installed to /home/coldnew/petalinux/2018.2/.

安裝完後,現在我的 ~/petalinux/2018.2 會有這些檔案

coldnew@gentoo ~/petalinux/2018.2 $ tree -L 2.
. <b>
├── components <b>
│   ├── apps <b>
│   ├── misc <b>
│   └── yocto <b>
├── etc <b>
│   ├── hsm <b>
│   ├── libs <b>
│   ├── license <b>
│   ├── logging <b>
│   ├── qemu <b>
│   ├── scripts_py <b>
│   └── template <b>
├── settings.csh
├── settings.sh
└── tools <b>
    ├── common <b>
    ├── hsm <b>
    ├── lib <b>
    ├── linux-i386 <b>
    └── webtalk <b>

18 directories, 2 files

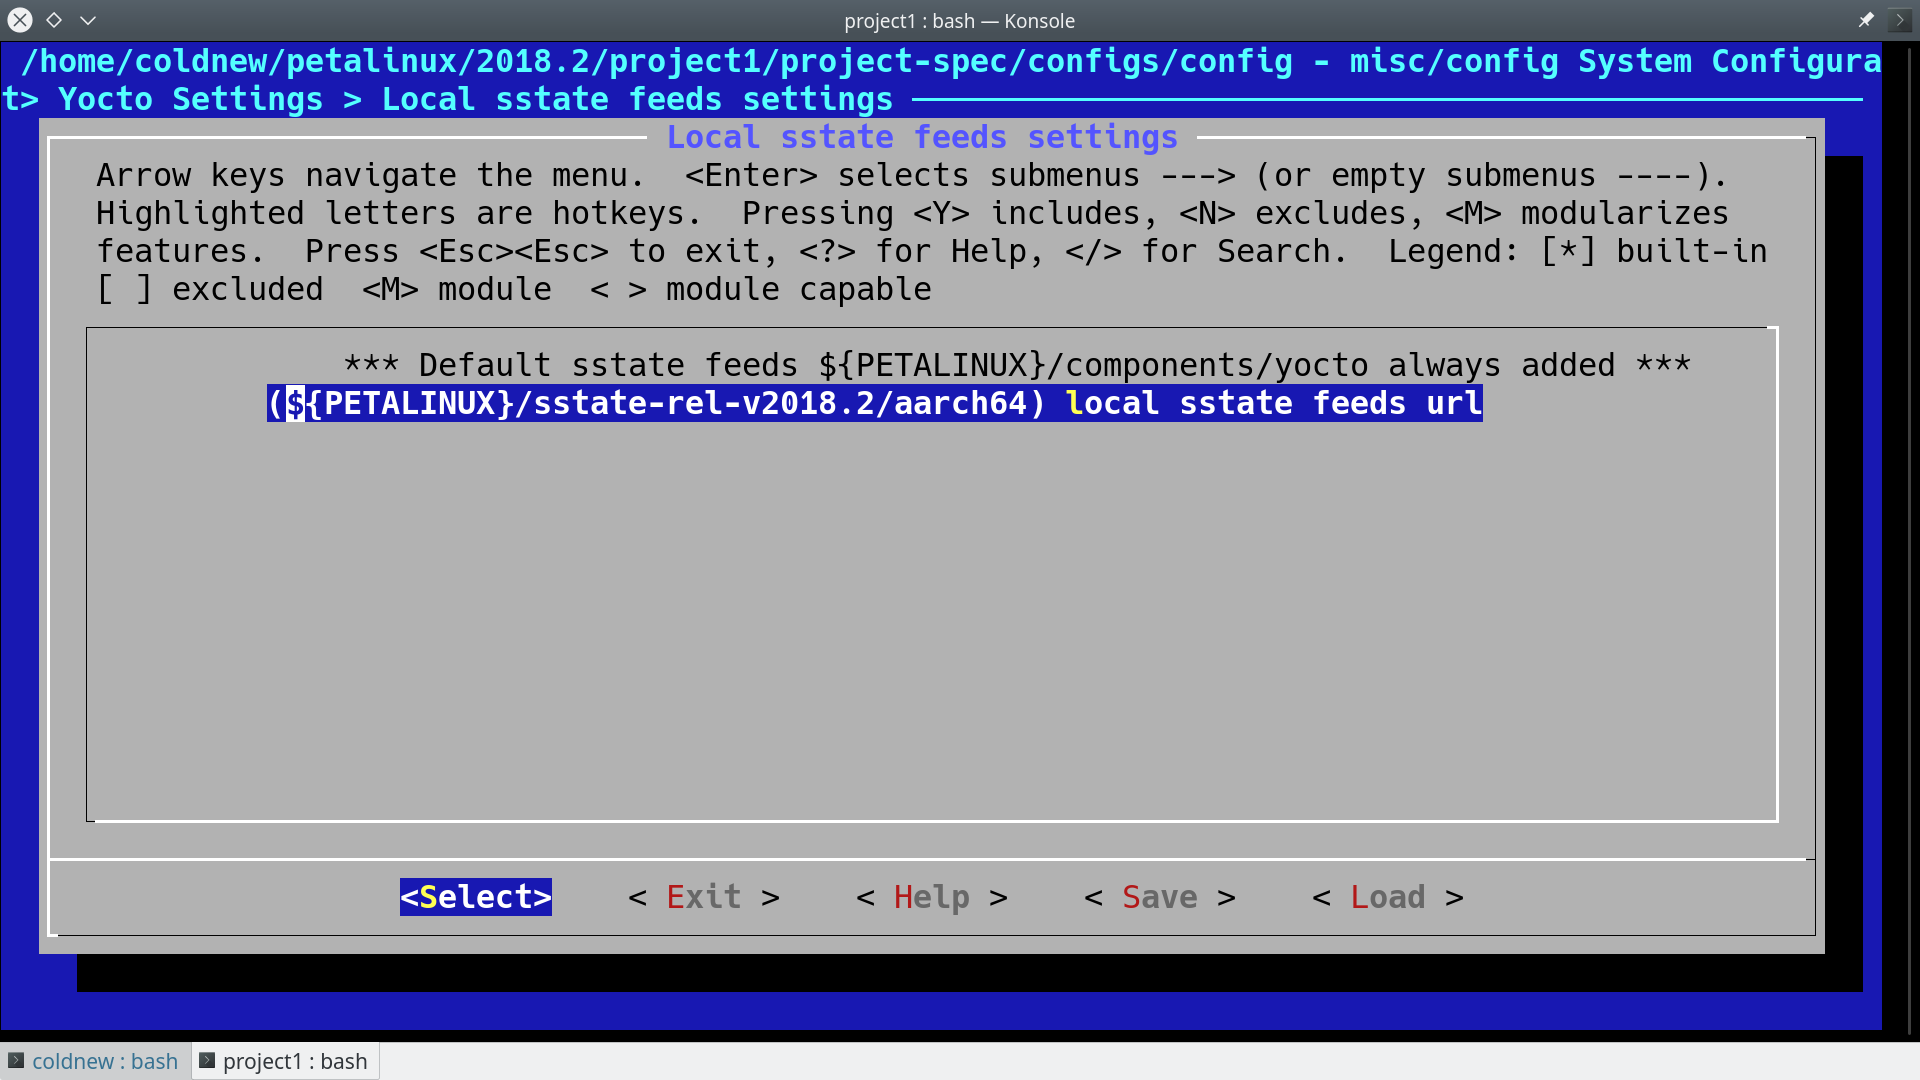
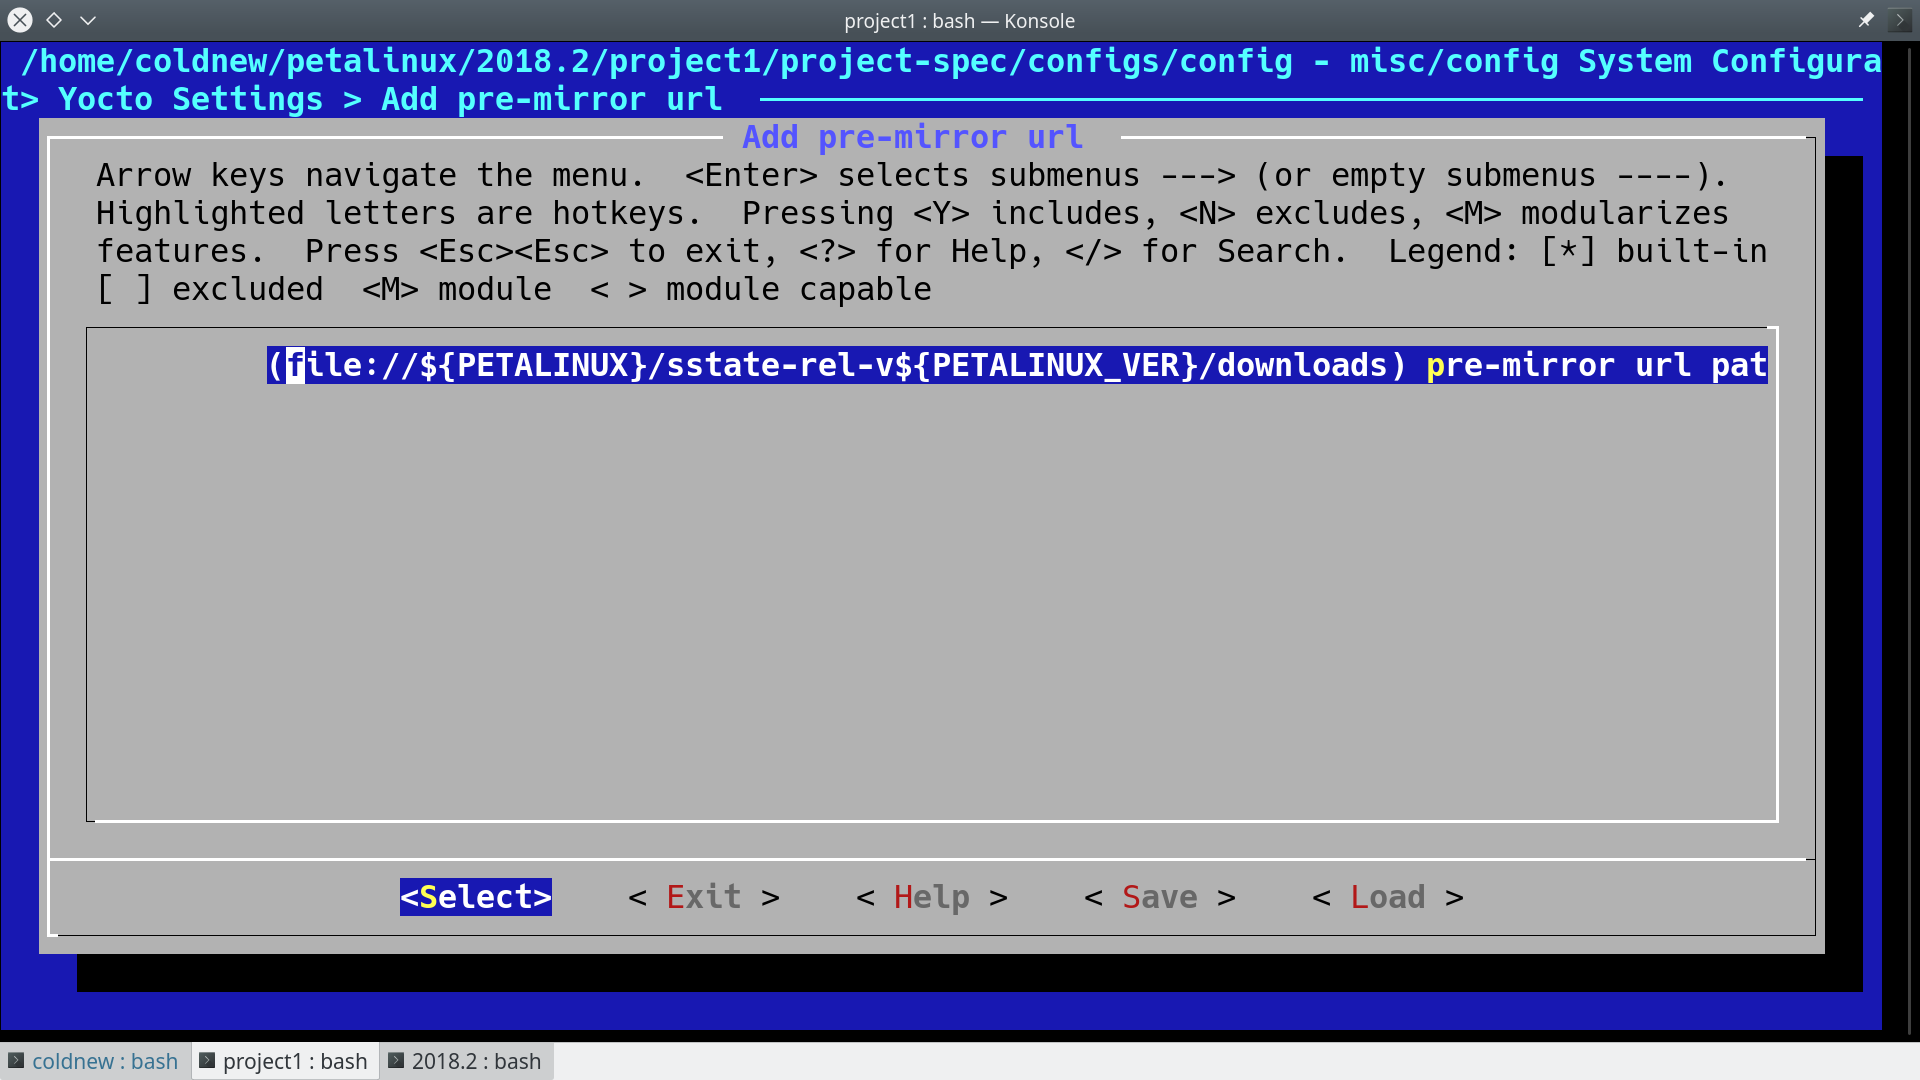
接下來,把 sstate-rel-v2018.2.tar.gz 解壓縮到這個目錄下

coldnew@gentoo ~/petalinux/2018.2 $ tar xvf ~/sstate-rel-v2018.2.tar.gz

你會發現到在 ~/petalinux/2018.2 裡面增加了 sstate-rel-v2018.2 這個資料夾。接著一樣解壓 uz3eg_pciec_2018_2.zip 會得到 uz3eg_pciec_2018_2.bsp 這個檔案。

現在讓我們來建立我們的編譯環境吧~

建立編譯環境

要進入到 PetaLinux 的環境,我們首先要 source settings.sh 一下

coldnew@gentoo ~/petalinux/2018.2 $ source settings.sh
PetaLinux environment set to '/home/coldnew/petalinux/2018.2'
INFO: Checking free disk space
INFO: Checking installed tools
INFO: Checking installed development libraries
INFO: Checking network and other services
WARNING: No tftp server found - please refer to "PetaLinux SDK Installation Guide" for its impact and solution

我們進入到 PetaLinux 的環境了,利用剛剛的 uz3eg_pciec_2018_2.bsp 來建立我們的專案吧,這裡命名為 project1

coldnew@gentoo ~/petalinux/2018.2 $ petalinux-create -t project  -s uz3eg_pciec_2018_2.bsp --name project1
INFO: Create project: project1
INFO: New project successfully created in /home/coldnew/petalinux/2018.2/project1

於是 PetaLinux 依據 uz3eg_pciec_2018_2.bsp 的資料,幫我們建立好 project1 這個資料夾,進去看看有什麼

coldnew@gentoo ~/petalinux/2018.2/project1 $ tree -L 2.
. <b>
├── components <b>
│   └── plnx_workspace <b>
├── config.project
├── hardware <b>
│   └── UZ3EG_PCIEC <b>
├── pre-built <b>
│   └── linux <b>
└── project-spec <b>
    ├── attributes
    ├── configs <b>
    ├── hw-description <b>
    ├── meta-plnx-generated <b>
    ├── meta-user <b>
    └── yocto-layer.log <g>

11 directories, 3 files

這就是我們編譯環境的資料夾大致組成,使用者最需要關注的就是 project-spec 這資料夾囉,裡面會包含我們自己額外定義的一些 Yocto recipes 和 Xilinx 工具產生的一些相關 patch 等,具體資訊後續文章有機會會再題到。

設定 PetaLinux

進入到我們開發用的 project1 目錄後,第一步就是對 PetaLinux 進行設定

coldnew@gentoo ~/petalinux/2018.2/project1 $ petalinux-config

就會進入到 ncursed based 的畫面,我們需要指定我們的 sstate-cache 資料夾的位置

文字版

Yocto Settings  --->
 Local sstate feeds settings  --->
   (${PETALINUX}/sstate-rel-v${PETALINUX_VER}/aarch64) local sstate feeds url

圖片版

另外也指定預先下載資料夾位置

文字版

Yocto Settings  --->
 Add pre-mirror url   --->
  (file://${PETALINUX}/sstate-rel-v${PETALINUX_VER}/downloads) pre-mirror url path

圖片版

設定好後,存檔!

編譯系統

編譯 PetaLinux 是很輕鬆愉快的,只要下 petalinux-build 然後去睡個覺就好了~

coldnew@gentoo ~/petalinux/2018.2/project1 $ petalinux-build

如果你有遇到編譯錯誤,可以到 其他遇到的問題 找看看是否我也有遇到

編譯完成後,在 images 資料夾下面就增加一堆檔案囉~

coldnew@gentoo ~/petalinux/2018.2/project1 $ tree -L 2 ./images/
./images/ <b>
└── linux <b>
    ├── bl31.bin
    ├── bl31.elf
    ├── Image
    ├── image.ub
    ├── pmufw.elf
    ├── rootfs.bin
    ├── rootfs.cpio <r>
    ├── rootfs.cpio.bz2 <r>
    ├── rootfs.cpio.gz <r>
    ├── rootfs.cpio.gz.u-boot
    ├── rootfs.ext3
    ├── rootfs.ext3.bz2 <r>
    ├── rootfs.ext4
    ├── rootfs.ext4.gz <r>
    ├── rootfs.its
    ├── rootfs.jffs2
    ├── rootfs.manifest
    ├── rootfs.tar.bz2 <r>
    ├── rootfs.tar.gz <r>
    ├── rootfs.testdata.json
    ├── system.bit
    ├── system.dtb
    ├── System.map.linux
    ├── u-boot.bin
    ├── u-boot.elf
    ├── vmlinux
    └── zynqmp_fsbl.elf

1 directory, 27 files

在這次的開發中,我們會用到的檔案在這邊只有 image.ub 這一個而已,這個檔案其實是 Linux Kernel Image + Ramdisk 的組合,開機完成後 Kernel 會直接進入到 Ramdisk 裡面的 rootfs 去。

現在有了 kernel image 了,實際上我們還少了一個開機用的 BOOT.bin ,這個檔案就需要自己手動生成囉 ~

製作 BOOT.bin

images 資料夾下生出的一駝檔案內,沒有開機時第一個被載入的 BOOT.bin ,因此我們需要自己透過命令去產生。注意到這邊命令一定要把你的位元流 (bitstream) 給包進來,以此範例就是 images/linux/system.bit 這個檔案。

coldnew@gentoo ~/petalinux/2018.2/project1 $ petalinux-package --boot --u-boot --fpga ./images/linux/system.bit
INFO: File in BOOT BIN: "/home/coldnew/petalinux/2018.2/project1/images/linux/zynqmp_fsbl.elf"
INFO: File in BOOT BIN: "/home/coldnew/petalinux/2018.2/project1/images/linux/pmufw.elf"
INFO: File in BOOT BIN: "/home/coldnew/petalinux/2018.2/project1/images/linux/system.bit"
INFO: File in BOOT BIN: "/home/coldnew/petalinux/2018.2/project1/images/linux/bl31.elf"
INFO: File in BOOT BIN: "/home/coldnew/petalinux/2018.2/project1/images/linux/u-boot.elf"
INFO: Generating zynq binary package BOOT.BIN...


****** Xilinx Bootgen v2018.2
  **** Build date : Jun 14 2018-20:09:18
    ** Copyright 1986-2018 Xilinx, Inc. All Rights Reserved.

INFO: Binary is ready.
WARNING: Unable to access the TFTPBOOT folder /tftpboot!!!
WARNING: Skip file copy to TFTPBOOT folder!!!

我們可以看到當呼叫 petalinux-package 後,它會透過 Xilinx SDK 裡面的 Bootgen 程式幫我們把實際要用的 BOOT.bin 產生出來,在 UltraScale+ 系列的 SoC,其 BOOT.bin 和 Zynq 系列多少還是有些差異,這些之後有時間可以來講講整個 BOOT.bin 的開機流程。

當剛剛的命令下好之後,會生出 BOOT.bin 檔案,位於 images/linux/BOOT.bin

coldnew@gentoo ~/petalinux/2018.2/project1 $ ls -lh images/linux/BOOT.BIN
-rw-r--r-- 1 coldnew coldnew 6.4M 12 月  8 08:38 images/linux/BOOT.BIN

於是我們可以來製作我們的 SD 卡啦

製作 SD 卡

現在來製作 SD 卡啦,基本上你的卡片只要第一個分割區是 fat32 就可以了,我們複製 images/linux/ 下的這兩個檔案到 SD 卡 的 分割區 1

BOOT.bin
image.ub

這樣就好囉!

設定 SD 卡開機

為了透過 MicroSD 卡開機,我們需要對 UltraZed-EG 上的 SW2 要進行一些調整,變成下圖這樣。

設定好並裝上 MicroSD 卡後後,按下 Reset 按鈕或是重開機就可以看看是否有開機成功了,我們可以在 Liunux 下的 /dev/ttyUSB1 收到訊息。

結果

按照本篇文章的設定,你的 UltraZed-EG PCIe Carrier Card 顯示應該如以下影片:

這是因為這份 AVNET 公司所提供的 BSP 預設會啟動一個名為 blinky 的 LED 閃爍燈程式,我們後續文章將講解如何自製自己的 rootfs。

另外,我們也可以透過 minicom, emacs, tio, gtkterm 等終端機軟體,連接上 /dev/ttyUSB1 來查看透過 printf() 輸出的訊息。其中登入用的帳號為 root ,密碼也是 root


Release 2018.2   Dec  7 2018  -  13:16:01
NOTICE:  ATF running on XCZU3EG/silicon v4/RTL5.1 at 0xfffea000
NOTICE:  BL31: Secure code at 0x0
NOTICE:  BL31: Non secure code at 0x8000000
NOTICE:  BL31: v1.4(release):xilinx-v2018.1-4-g93a69a5a
NOTICE:  BL31: Built : 14:47:04, Dec  6 2018
PMUFW:  v1.0


U-Boot 2018.01 (Dec 06 2018 - 22:47:22 +0800) Xilinx ZynqMP ZCU102 rev1.0

I2C:   ready
DRAM:  2 GiB
EL Level:       EL2
Chip ID:        zu3eg
MMC:   sdhci@ff160000: 0 (eMMC), sdhci@ff170000: 1 (SD)
SF: Detected n25q256a with page size 512 Bytes, erase size 128 KiB, total 64 MiB
In:    serial@ff000000
Out:   serial@ff000000
Err:   serial@ff000000
Board: Xilinx ZynqMP
Net:   ZYNQ GEM: ff0e0000, phyaddr 9, interface rgmii-id
eth0: ethernet@ff0e0000
Hit any key to stop autoboot:  0
boot Petalinux

*********************************************************************
***                                                               ***
***   Avnet UltraZed Out Of Box PetaLinux Build V1.2              ***
***   The PS LED is mapped to ZynqMP MIO26                        ***
***                                                               ***
*********************************************************************


PetaLinux 2018.2 uz3eg-pciec-2018-2 /dev/ttyPS0

uz3eg-pciec-2018-2 login: root
Password:
root@uz3eg-pciec-2018-2:~#

其他遇到的問題

以下列出我在使用 PetaLinux 2018.2 搭配 Gentoo Linux 遇到的一些問題與處理方案

在使用 Gentoo Linux 或是 Ubuntu 18.04 編譯 PetaLinux 2018.2 的時候都會遇到這樣的錯誤

ERROR: petalinux-user-image-1.0-r0 do_rootfs: [log_check] petalinux-user-image: found 4 error messages in the logfile:
log_check] Failed to set locale, defaulting to C

這個問題的來源是 Python ,因此我們需要參考 Re: PetaLinux build fails with locale errors. How to disable locale checks? 一文進行修正,怎樣修正呢? 這一版本 PetaLinux 搭配的是 Python 3.5, 因此我們找出裡面的 locale.py 搭配以下的 patch 進行修改就好了

--- a/locale.py     2018-10-15 17:25:17.190016676 +0800
+++ b/locale.py     2018-10-15 17:27:00.410016591 +0800
@@ -591,7 +591,11 @@
     if locale and not isinstance(locale, _builtin_str):
         # convert to string
         locale = normalize(_build_localename(locale))
-    return _setlocale(category, locale)
+    try:
+        return _setlocale(category, locale)
+    except:
+        pass
+

 def resetlocale(category=LC_ALL):

因為要修改的檔案很多,你可以 下載 locale.py 來取代手動編輯的動作,將這個 locale.py 複製到以下路徑

首先接到我們要編譯的環境,這邊以 project1 為例子

coldnew@gentoo ~/petalinux/2018.2 $ source settings.sh
coldnew@gentoo ~/petalinux/2018.2 $ cd project1

接下來用以下指令將 locale.py 複製到這些位置

# NOTE: first modify one locale.py
# then copy to following path
export LOCALEPY="~/locale.py"

cp "${LOCALEPY}" ./build/tmp/sysroots-components/aarch64/python3/usr/lib/python3.5/locale.py
cp "${LOCALEPY}" ./build/tmp/sysroots-components/x86_64/python3-native/usr/lib/python3.5/locale.py
cp "${LOCALEPY}" ./build/tmp/work/plnx_zynqmp-xilinx-linux/fsbl/2018.2+gitAUTOINC+6e82c0183b-r0/recipe-sysroot-native/usr/lib/python3.5/locale.py
cp "${LOCALEPY}" ./build/tmp/work/plnx_zynqmp-xilinx-linux/pmu-firmware/2018.2+gitAUTOINC+6e82c0183b-r0/recipe-sysroot-native/usr/lib/python3.5/locale.py
cp "${LOCALEPY}" ./build/tmp/work/plnx_zynqmp-xilinx-linux/petalinux-user-image/1.0-r0/recipe-sysroot-native/usr/lib/python3.5/locale.py
cp "${LOCALEPY}" ./build/tmp/work/plnx_zynqmp-xilinx-linux/linux-xlnx/4.14-xilinx-v2018.2+gitAUTOINC+ad4cd988ba-r0/recipe-sysroot-native/usr/lib/python3.5/locale.py

cp "${LOCALEPY}" ${PETALINUX}/components/yocto/source/aarch64/buildtools/sysroots/x86_64-petalinux-linux/usr/lib/python3.5/locale.py
cp "${LOCALEPY}" ${PETALINUX}/components/yocto/source/buildtools/sysroots/x86_64-petalinux-linux/usr/lib/python3.5/locale.py

或是直接用 find 一行命令解決 (假設已經修改好的 locale.py 放在 ~/locale.py)

find ${PETALINUX} -name locale.py -exec cp ~/locale.py {} \;

這樣再重新編譯就沒問題囉~