在 在 emacs 中使用 EasyPG 加密文章 一文中談到了如何在 emacs 裡面對於文章使用 GnuPG 進行加密。隨著 emacs 已經到了 emacs 25,有些早期的東西可能有些變化,讓我們來談談如何在 emacs 的 mini-buffer 直接輸入 GnuPG 要的密碼,而不需要彈出系統的圖形界面視窗。
當我們在輸入 GnuPG 的密碼的時候,彈出的圖形視窗 (純終端機情況下可能是 curse 界面) 稱作為 pinentry, 根據不同的實做以及平台有不同的版本,比如我的 Gentoo Linux 就至少有以下幾種版本:
coldnew@gentoo ~ $ eselect pinentry list
Available pinentry binary implementations:
  [1]   pinentry-gnome3
  [2]   pinentry-qt *
  [3]   pinentry-gtk-2
  [4]   pinentry-qt4
  [5]   pinentry-curses
  [6]   pinentry-tty
而本文的目的,就是在使用 emacs 的時候,採用的是 pinentry-emacs 而不是系統設定的版本。
設置 gpg-agent
首先我們要先設定 ~/.gnupg/gpg-agent.conf 這個檔案,並加入如下內容:
# Emacs support
allow-emacs-pinentry
allow-loopback-pinentry

# (optional) if you want to set timeout (second)
pinentry-timeout 3
完成後,我們需要透過 gpgconf 來告訴 gpg-agent 設定檔案有變動
coldnew@gentoo ~ $ gpgconf --reload gpg-agent
當然你也可以透過 kill 命令強制幹掉它
coldnew@gentoo ~ $ kill -9 `pidof gpg-agent`
設定 emacs
設定完 `gpg-agent` 後,接下來就是設定 emacs 啦,首先我們先安裝 pinentry.el ,這個套件可以在 elpa (emacs 預設的套件倉庫) 裡面找到:
M-x package-install RET pinentry RET
接下來在你的 ~/.emacs 加入:
;; GnuPG 2.1 or later has an option to control the behavior of
;; Pinentry invocation.  When set this to `loopback', which redirects
;; all Pinentry queries to the caller, so Emacs can query passphrase
;; through the minibuffer instead of external Pinentry program.
(require 'epa)
(setq epa-pinentry-mode 'loopback)

;; Start the Pinentry service
(require 'pinentry)
(pinentry-start)
並對上面的設定進行 eval ,就可以看到設定生效啦 ~
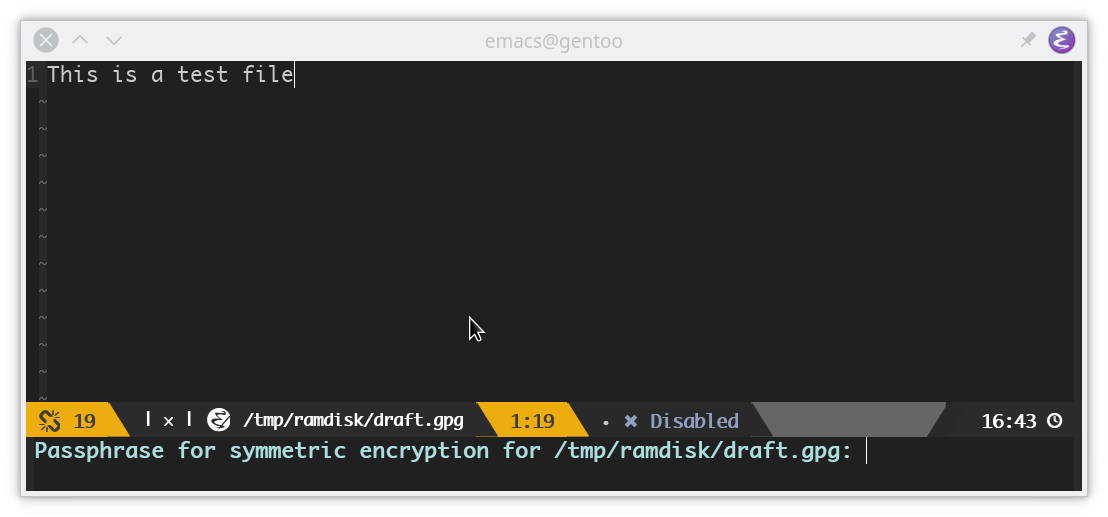
結果
按照以上的設定,並確定有重起 gpg-agent 的話,在編輯 *.gpg 的檔案時,應該會看到密碼輸入欄是顯示在 mini-buffer 上的: